Dummies guide to hallowindow's editing.
Hallowindow "VS" Microsoft windows
what we need..
A Windows 7 PC to drive the video or an DVD player, blank DVD and Windows 7 DVD Maker.
Windows Live Essentials 2011 (free download)
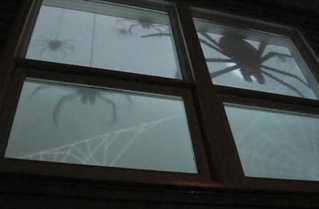
A white sheet to cover the window. WHITE, no patterns, & ironed or reasonably crease free..
(leave it up a few days beforehand so the material can relax)
Black garden weed blocker fabric from local DIY store.
NO patterns, NO logos.
I’m using an Optoma EX530 SVGA DLP Projector. It has a great throw ratio and at 2500 lumens is bright enough for outdoor movies during the summer.
A standard-definition projector will work with VGA input. A must though, is to get one with 2000 lumens or more. Also look for ability to adjust keystone (angle for incremental off centre picture adjustment), & ability to reverse the image.
Step 2: Got Hallowindow Animation DVD / Download? http://www.hallowindow.com/
Hallowindow is a series of Halloween-themed a/v fx by Mark Gervais in Alberta Canada.
You can order a well priced DVD or purchase individual videos for download via PayPal for instant use, ..then burn your own pertaining to your own set up requirements.
I opted for physical DVD's as that's how I like it. The burn process however is described below.
Step 3: Got Video ??
I have a 4 of his 5 editions. Whilst i've never had problematic feedback form the community as to "too scarey" you may have different views as to overall suitability,
My personal take is that parents & children know what to expect when visiting, & our efforts are the reason they visit. We do tell children it's simply a night of sometimes scarey fun, & if a child is about to burst into tears we are gentle, removing costumes & making a fuss of them (unless they are dressed as pink fairies & princesses ..in which case let their mothers do it, you'll be there all night otherwise)
For this reason, you may wish to edit out the stronger stuff (if deemed unsuitable) with Windows Live Movie Maker, a free download in Windows Live Essentials 2011.
Simply use the “Snip” tool in order to edit the clips to your exact requirements. Have fun playing with the available effects & text overlays...
Step 4: Save edited scenes in the recommended quality.
This will create a video file that you can then burn to DVD..
Step 5: Burning your DVD via Windows 7 DVD Maker.
Previously, & depending on how many windows we wish to animate I use a Netbook / Laptop as my extra sources, However I prefer the simplicity of loading a dvd disc (old skool).
Windows 7 (and Windows Vista)tend to come pre-loaded come with a DVD Burning tool called Windows DVD Maker. simply type DVD into the Start menu search box and you’ll find Windows DVD Maker tucked away:
Step 6 :
Before burning your DVD, locate & check “Options” in the lower right corner and set the DVD to play in a continuous loop. DVD players tend to do this via the remote control but some (MIGHT) keep the on-screen display on which instantly ruins the desired effect & will have you gibbering like a madman as you make further adjustments.
Using a PC to drive video to the projector?
Check Windows Media Player is set to run in full screen.
Now move the mouse cursor back over to the main Windows display.
This sets your player controls to "hide" stopping any alerts / notifications do not appear on the projector.
Your Hallowindow dvd will be running for around 6 hours per night in operation, so make sure any power supplies are plugged in lest you have a low battery crisis!
Please note: all my Hallowindows are region free & work on both my old x-box & x-box360 without any trouble, in case you are limited to moving kit around someone usually has a games console they'll give up for the night!
A Windows 7 PC to drive the video or an DVD player, blank DVD and Windows 7 DVD Maker.
Windows Live Essentials 2011 (free download)
A white sheet to cover the window. WHITE, no patterns, & ironed or reasonably crease free..
(leave it up a few days beforehand so the material can relax)
Black garden weed blocker fabric from local DIY store.
NO patterns, NO logos.
I’m using an Optoma EX530 SVGA DLP Projector. It has a great throw ratio and at 2500 lumens is bright enough for outdoor movies during the summer.
A standard-definition projector will work with VGA input. A must though, is to get one with 2000 lumens or more. Also look for ability to adjust keystone (angle for incremental off centre picture adjustment), & ability to reverse the image.
Step 2: Got Hallowindow Animation DVD / Download? http://www.hallowindow.com/
Hallowindow is a series of Halloween-themed a/v fx by Mark Gervais in Alberta Canada.
You can order a well priced DVD or purchase individual videos for download via PayPal for instant use, ..then burn your own pertaining to your own set up requirements.
I opted for physical DVD's as that's how I like it. The burn process however is described below.
Step 3: Got Video ??
I have a 4 of his 5 editions. Whilst i've never had problematic feedback form the community as to "too scarey" you may have different views as to overall suitability,
My personal take is that parents & children know what to expect when visiting, & our efforts are the reason they visit. We do tell children it's simply a night of sometimes scarey fun, & if a child is about to burst into tears we are gentle, removing costumes & making a fuss of them (unless they are dressed as pink fairies & princesses ..in which case let their mothers do it, you'll be there all night otherwise)
For this reason, you may wish to edit out the stronger stuff (if deemed unsuitable) with Windows Live Movie Maker, a free download in Windows Live Essentials 2011.
Simply use the “Snip” tool in order to edit the clips to your exact requirements. Have fun playing with the available effects & text overlays...
Step 4: Save edited scenes in the recommended quality.
This will create a video file that you can then burn to DVD..
Step 5: Burning your DVD via Windows 7 DVD Maker.
Previously, & depending on how many windows we wish to animate I use a Netbook / Laptop as my extra sources, However I prefer the simplicity of loading a dvd disc (old skool).
Windows 7 (and Windows Vista)tend to come pre-loaded come with a DVD Burning tool called Windows DVD Maker. simply type DVD into the Start menu search box and you’ll find Windows DVD Maker tucked away:
Step 6 :
Before burning your DVD, locate & check “Options” in the lower right corner and set the DVD to play in a continuous loop. DVD players tend to do this via the remote control but some (MIGHT) keep the on-screen display on which instantly ruins the desired effect & will have you gibbering like a madman as you make further adjustments.
Using a PC to drive video to the projector?
Check Windows Media Player is set to run in full screen.
Now move the mouse cursor back over to the main Windows display.
This sets your player controls to "hide" stopping any alerts / notifications do not appear on the projector.
Your Hallowindow dvd will be running for around 6 hours per night in operation, so make sure any power supplies are plugged in lest you have a low battery crisis!
Please note: all my Hallowindows are region free & work on both my old x-box & x-box360 without any trouble, in case you are limited to moving kit around someone usually has a games console they'll give up for the night!